Saturday, November 26, 2016

Masala Pav / Masala Buns


Masala Pav

Pav Bhaji is one of the most famous quick eats from Mumbai streets. You would think making fast food faster would not be possible - but trust Mumbaikars to come up with unique ideas! This take on Masala Pav is an ode to the famous Pav Bhaji with unparalleled simplicity and flavor. It is the perfect 4pm snack with a hot cup of tea!

Ingredients:
  • 4 Pav (you can use hard rolls or water rolls from the Deli)
  • 2 Tblsp butter
  • 1 Tblsp garlic paste (or 3 cloves garlic)
  • 2 fresh tomatoes
  • 1 large onion
  • 1/2 large green pepper (capsicum)
  • 2 Tsp salt
  • 1.5 Tblsp Pav Bhaji masala
  • 1.5 Tsp red chilli powder
  • 1/4 cup water
  • 1 Tbsp lemon juice
  • 1/2 cup cilantro chopped
First, chop the onions, green pepper and tomatoes fine.


Put a large saucepan or griddle (tava) on medium heat and add 1 Tblsp on butter to it. As the butter melts, rotate the saucepan slowly so that the butter covers the entire base. Add the garlic paste to this and saute it until it starts to turn brown. If you're using fresh garlic cloves, crush them fine before you add them to the butter. Using fresh garlic is always better - the paste has vinegar based preservatives which can sometimes play into the food flavor but for this recipe you're fine either way.

Add the onions to the pan and saute them well. As they start to get translucent, add the peppers and cook for 3 minutes before adding the tomatoes.


Cook the mixture for 3-5 more minutes. Now add, salt, chilli powder, the pav bhaji masala and the water to the mixture and mix well. If you have a potato masher handy, use it to mash the mixture. It should start to look like pav bhaji. :)

Add the lemon juice, mix well and move the mixture to one side of the pan. Now, add 1/4 Tblsp butter on the empty side on the pan. Slice one of buns in half (like a burger) and cook the buns in this butter on both slides.


For the assembly, add the mixture on both sides of the bun, adding some cilantro on the bottom half. Add the top part back on, smear more mixture on the outer side as well, garnishing with cilantro. Enjoy!

Potato Soup

Potato Soup
Fall is slowly turning into winter and there is a definite chill in the evening air. Potato soup is great comfort soup on such nights. I tried it out this past weekend and it turned out great. Definitely try it in the winters!

Ingredients:

  • 1 full head of garlic
  • 2 Tblsp Olive Oil
  • 8 medium red Potatoes
  • 2-3 sprigs of green onions
  • 1/4 Cup diced Celery
  • 1.5 Cups chopped Cauliflower florets
  • 8 Cups vegetable broth
  • 1/3 Cup unsalted Cashews
  • 1/4 Turmeric powder
  • 1 Tblsp lemon juice
  • 1 Cup baby spinach cut into ribbons

Using a garlic press, crush all the cloves of a single garlic and roast the mix in a few drops of olive oil till it starts to turns brown. Keep this aside. Now peel the potatoes and dice them into medium chunks. Wash these under cold water to remove some starch.

Now, take a large pot (this is what you'll be cooking the soup in) and heat the remaining olive oil over medium heat. Olive oil has a very low smoking point so make sure your heat is not high. Add the celery and most of the spring onions - you want to keep some greens for garnishing. Saute for 5 minutes and as the vegetables begin to get translucent, add 1 Tsp salt. Now, add the potatoes, cauliflower, the garlic pulp roasted in the beginning and pour 7 cups of the broth in the pot. Mix well and increase the heat to high.

Once the mix starts to boil, reduce the heat to medium-low and let it simmer for about 15-20 minutes. By now the potatoes and cauliflower should be tender enough to be poked by a fork.  Once you get to this point, remove the soup from heat - this helps in preventing starch build up. Stir in the cashews and turmeric powder and mix well.

Finally, you will need to blend the soup in a food processor or a blender. Use the remaining broth to assist with this. The result should be smooth and creamy and you may need to work this part in batches. Pour the soup back to the pot, add the lemon juice and warm over low heat. Stir in the spinach and heat for a minute or so for the leaves to wilt before turning the heat off.

Garnish with the green onions or chives and serve piping hot. A new favorite for the cold evenings!

Sunday, August 7, 2016

Chinese Bhel

Chinese Bhel
"Bhel" is the quintessential snack from Mumbai, perhaps second only to Samosas in terms of global fame. Chinese Bhel is something born on the streets on Mumbai; It is a perfect marriage of Indian and Chinese cuisine with fried crispy noodles substituting puffed rice in the Bhel with some other variations thrown in.

This is a simple recipe to follow and I am certain it is a snack you'll want to make over and over! Here is what you will need (ingredients to serve 2-3)

  • 1 slab of raw vegetarian hakka noodles (100-150 grams)
  • Oil to fry
  • 2 cloves Garlic
  • 1/2 Green Bell Pepper thinly sliced
  • 1/2 Red Bell Pepper thinly sliced
  • 1/2 cup Cabbage shredded
  • 1/2 cup Carrots shredded
  • 2.5 Tblsp Tomato ketchup
  • 1.5 Tblsp red Chilli sauce (or Sriracha sauce)
  • 1.5 Tblsp Vinegar
  • 1.5 Tblsp Soy sauce
  • 0.5 Tsp Salt
  • 3-4 springs of Spring Onion
For the noodles, you can use any store bought noodles pack that you would use for lo-mein. Soak the noodles in cold water for 30 to 45 minutes. Noodles will be one slab at first and that is fine - they will be easier to maneuver after the soak.  In the meantime, slice the vegetables as shown below.


You can prepare the sauce as well - in a bowl, add the tomato ketchup, chilli sauce, vinegar and soy sauce together and mix well. That's it - keep this aside.

At this time, you can begin frying the noodles. Drain all the water from the noodles and work with your fingers to untangle them as much as possible. I have found that this helps the frying process. Even though the noodles are wet, you should not have to worry about oil splatters. Drop the noodles into oil at med-high heat and fry for a good 3-4 minutes. If you take them out any earlier, the noddles come out soggy.This can be a little tricky since the noodles won't brown either. Test this out with a small batch first until you have a hang of it.


In a pan, heat 2 Tblsp of oil. Add crushed garlic and fry for 30 seconds. Add the vegetables and fry for 2-3 minutes on medium-high heat. You will want the vegetables to get cooked but not too soggy. If you feel the vegetables are burning due to lack of oil, cover the pan and let the vegetables cook for 30 seconds.


Once the vegetables are cooked, add the sauce and mix well. Add the salt - go  easy on the salt since the sauce has a high salt context already. Add some spring onion (keep some for garnishing) and finally, add the crisp noodles. Toss the mixture well and garnish with green onions.

That's it - Enjoy!

Friday, June 26, 2015

Guacamole

Guacamole

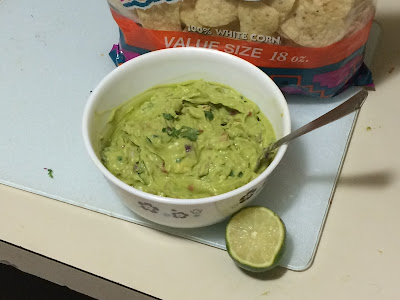
I have really gotten addicted to Guacamole over the last few months: It is my go to appetizer in Mexican food. Guacamole is a traditional Mexican dip with tortilla chips. Here is a simple recipe that is sure to be a hit at any party, pot luck or an evening at home.

  • 3 avocados
  • 1 Roma tomato
  • 1 medium red onion
  • 1/2 cup cilantro
  • 1 lime
  • 1 Serrano pepper
  • 1/2 Tsp red pepper
  • 1 Tsp ground roaster cumin powder
  • 1 Tsp Salt

If have not picked avocados at the market before, here are 2 broad thumb rules to follow. Visually they should be brown but with a hint of green. Second, they should feel firm but not too firm.

First off, cut, peel and half the avocados as shown below. Avocados are very easy to peel - you first halve them - the seed remains in one of the halves.You should be able to peel the skin off with your fingers and be able to pop the seed out with a spoon or a knife.


Next, we need to mash the avocados. How and how much you mash depends on the overall consistency you desire. This is very much like salsa - some like it chunky, some don't. I prefer medium,so I usually use the blender to give it a quick whirl and get the desired consistency. Usually you should be able to use a potato masher or even a spoon to get the job done. This is a before and after of my avocados:


Transfer the mashed avocados to a bowl. Now add the finely chopped onion and tomato into the bowl as well. I usually leave the juicy seeds of the tomato out of the recipe but you can throw that in as well.Now slice the Serrano pepper, remove the seeds, mince it and add to the bowl as well. 

Chop the cilantro and ad it along with the salt and spices. Finally, add the juice of the lime to the mixture. You should a very colorful mix in the bowl :)


Mix well and refrigerate for about 20 minutes before serving with tortilla chips.
¡Buen provecho!

Monday, May 25, 2015

Quinoa Chickpea Stir Fry

Quinoa Chickpea Stir Fry
Quinoa seems to be the "in" food nowadays! And for good reason too: 1 Cup (170 g) of Quinoa provides 24 g of protein, 12 g of fiber and is very rich in specific minerals. The other thing a lot of folks don't know is that it technically isn't even a cereal grain - it is actually a seed. You see a lot of Quinoa reference in hip health blogs and magazines. Here is an easy recipe to get you started if you buy some Quinoa from the grocery store.(You can even get it from Walmart of Sam's Club)

I found this recipe on Yummly.

  • 3 Tblsp Olive Oil
  • 3-4 cloves Garlic
  • 1 Tsp Ginger chopped fine
  • 1 green chilly chopped fine
  • 2 Tsp Red Chilli powder
  • 2 Tsp Cumin powder
  • 2 Tsp Garam masala
  • 1/4 Tsp red pepper flakes
  • A pinch of black pepper
  • 1 medium onion sliced thin
  • 1 red bell pepper sliced thin
  • 4 Cups cooked Quinoa
  • 1 can chickpeas
  • 1 can tomatoes 
  • 3 Cups baby spinach leaves
  • 1/2 Tsp Salt
Heat the olive oil on medium low in a wok or large pan. Add the spices and let them simmer for 2-3 minutes. Turn the heat down if they start to burn. Then, add the onion and raise the heat to medium. 

Now, cook stirring frequently for about 3 minutes. Add the garlic, ginger and peppers and stir fry for a couple of minutes. Then add the quinoa and stir fry for another minute.


Add the chickpeas and cook, stirring frequently, for about 2 minutes. Finally, stir in the tomatoes, fold in the spinach and the salt and stir fry, stirring frequently for another 2 minutes. I like to puree out the tomatoes in a blender, even if they're out of a can. If you're using fresh, use 2 medium tomatoes. Using canned ones like zesty jalapeno add a nice kick sometimes.

Saturday, March 1, 2014

Vegetable Cutlet

Vegetable Cutlets
Vegetable cutlets are a classic and quintessential snack that you can find all over India. Anushka and I have nostalgia of vegetable cutlets served in long distance trains early morning! Since I made the green chutney a few days ago, I thought taking a shot at these would a good idea. Its really simple and this makes for a super tea time snack.

This is what you will need:

  • 3 medium potatoes
  • 1 medium sized carrot
  • 5-6 strings of green beans
  • 1 Tblsp sweet corn kernels
  • 1 Tblsp peas
  • 2 Tblsp coriander leaves chopped fine
  • 2 green chillies chopped fine
  • 1 Tsp freshly grated ginger
  • 2 Tsp salt
  • 1 Tsp red chilli powder
  • 1 Tsp coriander powder
  • 1 Tsp garam masala
  • 1 Tsp dried mango powder (aamchoor)
  • 1 Cup all purpose flour (maida)
  • 3 slices of bread
  • Oil for frying
The first thing to understand is that unlike tikkis, potatoes are not the star of this dish, the vegetables are. 3 potatoes may seem less but all they're doing is being a binding agent to the cutlet, so that's all you should need. Boil these potatoes, let them cool down and then peel and mash them.

Next, wash and chop the carrots and beans into fine bits and then steam them with the peas and corn. If you haven't steamed vegetables before, here is how to do it: Fill a deep vessel such as a pressure cooker with about 2-3 inches of water and put it on the stove to boil. Take a a metal strainer or a heat resistant colander with the vegetables in it and place it on top of the vessel, so that the vegetables are not touching the water. Cover the vessel with a lid in a manner so that only some steam is allowed to escape.. I'd say you want to let this steam for about 10 minutes. A good test is picking off a piece of carrot an biting through it. You don't want it too raw, neither do you want it mushy.

Once the vegetables are steamed, put them on a dry cloth napkin and squeeze the water from them. Don't worry about mincing peas or corn but don't be too hard on the squeeze. If required pat this mixture with a paper napkin.

Next, take the mashed potatoes in a wide prep bowl and add the vegetables, coriander, green chilies, ginger and spices.


Time to get he hands dirty: mix all of these well and create a ball of the overall mixture. Now oil your hands well and take about 2 Tblsp of the mixture and roll it into a small ball and then flatten it. The oil makes this process easier and the cutlets are less likely to break. You should be able to prepare about 10 cutlets - keep them aside.


At this point the major prep work is done. Now we have to work on the outer coating - the batter that is. First off, continually add water to the flour until you achieve a nice thick consistency. If this is too flid, then the batter will just slip off the cutlet before the flying begins. Substituting maida by rice flour  is an interesting touch here - the rice flour makes the exterior more crisp. Second, take the 3 slices of bread, tear them into 3-4 chunks and thrown them into the grinder to get fine breadcrumbs. We're ready.


Heat the oil - you want the oil to be on high heat else the cutlets will begin to crumble as soon as you dip them in the oil. Here is how you want to proceed - dip the cutlet in the batter, then quickly lather it with the breadcrumbs. This is how it should look before being thrown into the oil.


That's it, fry these until golden brown and serve the cutlets hot with chutney or sauce and piping hot tea.


Sunday, February 16, 2014

Coriander Mint Chutney


So this is simple recipe for the evergreen (pun intended) coriander mint chutney. This is an absolute must in the fridge for the occasional (or hopefully more frequent) times when fried delicacies come out of the kitchen - this goes great with almost snack, even meals.

Here is what you need:

  •  3 Cups coriander / cilantro leaves
  • 1 Cup mint leaves
  • 2 green chilies
  • 1 medium red onion
  • 1 medium tomato
  • 1.5 Tsp salt
  • Juice of half a lemon
  • 1/4 Tblsp sugar
I am kind of uncertain of the ratio between the leaves and this is important because if you ad too many mint leaves, the chutney can get too bitter - mint can add an unwanted sharp tinge. If you don't have mint leaves, just the coriander chutney is nice too, but the mint is extra nice. This is how the ratio looked like on the chopping board - mint leaves on the left, coriander on the right.


You will need a kitchen mixer-grinder for this. Chop the leaves a bit and do the same with the tomato and the onion. Throw them into the grinder and give it a whirl until you get a nice consistent paste. Now add the sugar, salt and lemon juice. I added this in the grinder itself and gave it another quick run to make sure everything was mixed nicely. 

That's it - I'd recommend frying some onion pakodas to enjoy this with.